

Music parameter construction skills to eliminate end-user frustration and dissatisfaction
iTunes Help – Creating good playlists
If you enjoyed this post, check out my other iTunes posts:
- iTunes Help – How to quickly and accurately rate your music
- iTunes Help – iTunes requests
- iTunes Help – Moving Your iTunes Library From A PC To A Mac (And Vice Versa)
- iTunes Help – Rebuilding your library
The title sounds impressive, doesn’t it? What I am getting at is being able to create personalised playlists that:
a) You want to listen to and that stop you from skipping songs
b) Help to set a particular mood
c) Allow you to find songs quickly
These are the three main things that I notice with most people’s playlists / music libraries. They spend about thirty minutes setting up very general playlists that contain five songs they like and after that, they get bored and random rubbish gets added as filler.
When I think about my music collection, I look at it like a chest of drawers. In the first draw, you have all the things you use on a daily basis, that you couldn’t go without. The second drawer contains things that you use on a regular basis, but you may not need them all the time. The third drawer contains items that you may need every once in a while, but they aren’t essential. The fourth drawer contains stuff that you never use, that you probably don’t even want, but haven’t got around to sorting through. The fifth and final drawer is full of stuff that you haven’t looked at and you have no idea what is in there at all, and there is probably some really important stuff buried deep in its bowels, covered by various debris. In reality, it would be preferable if the fifth drawer didn’t exist, but that means that you have to sort through it all and put it into its respective drawer.
There are a few steps that you need to take to take your entire music library out of the “fifth drawer” and create the other four, to have a fully functioning music library.
STEP 1. – Ratings. The first step is to rate your songs. Not some of the songs, not most of the songs, ALL of the songs. This can be an extremely daunting, especially if you have never rated songs before. There are 5 rules that I use to rate my songs (as iTunes has a 5 star rating system…apply this to your rating system as required).
Rule 1, 5 out of 5 stars: For a song to achieve this rating, it is a song that if I hear it, I think, “HELL YEAH, awesome track!”, which I will listen to through until the end. These are my favourite songs, which I will listen to over and over again, they are the ones I build playlists around.
Rule 2, 4 out of 5 stars: A song that I like and seven out of ten times I will listen to without skipping. I have to like the track and would like to listen to it. These songs, when new to my library, have the possibility of going up or down in rating, but they must be songs that I think – “If I had a personal radio station, would I want this song to be on the playlist?” If the answer is yes, then the song will receive a four rating.
Rule 3, 3 out of 3 stars: To achieve a 3, the song can have one of two criterion – Either it’s a well-known song that isn’t too bad, is not my personal favourite but I don’t mind OR is good as background music. These tracks are also possible of going up or down.
Rule 4, 2 out of 5 stars: These are songs that I dislike, ones that I just think, too boring or just bad. If a song ever gets this rating, it is very unlikely that it will ever move from this rating, unless for some reason it comes on and I happen to hear it differently.
Rule 5, 1 out of 5 stars: These songs are the scum of my music pool. They are the goop that sticks to the bottom of pans after cooking, the slimy gunk in the bottom of rivers – they suck and belong away from sight.
I always start thinking about Rule 1, it’s much more fun to find songs that you really like, rather than songs that really suck. During this process, you should start working on step 2, playlists.
You may ask, “what happens if you have LOTS of songs? How can you do it without listening to each song?” This was a problem that I encountered and conquered. When I first started thinking about organising my library, I was overwhelmed at how I was going to rate them all. I did two things – first, I would start the song, and would listen. Sometimes, you can automatically tell that you will like or dislike the song. If you can’t (or even if you can) skip 30 – 45 seconds into the song and listen again. This can help confirm or change your thoughts. If you still aren’t sure, skip forward again and have another listen. If you do this artist by artist this is made much easier, as you will begin to know what to expect from the artist, so you can more easily predict if you will like it or not.
STEP 2. – Your radio station. If you don’t know, I rarely listen to the radio these days. Why? Well apart from the copious amount of adverts, the song selection on most radio stations is bland and stagnant – they grab hold of ten songs and play them on repeat all day, every day until everyone says “Ugg, not this song AGAIN”. Wow, great way to ruin songs!
Put yourself in the position of the radio host – if they were running a radio station just for you, what would you want them to play? There would be a selection of songs from all over the place, new songs, old songs and favourite songs. Of course, you wouldn’t want to hear these songs over and over, you want variety.
This is the first playlist you should create. How? Remember how I mentioned about Rule 1 and 2? Create a smart playlist around these rules. (See the image below)

As you can see, I have placed all songs (all 7366 of them!) with greater than 3 out of 5 stars into the playlist. I have also turned on shuffle and repeat, so that it never turns off and is always varied.
This is great, as you will always hear songs you like, you won’t know what is coming and it’s all different. The next playlist to create is related to your radio station; think about when radio hosts start introducing new songs. They are confident the song will be popular, but they are not sure. The same can be said for you, you are pretty sure you will like the song, but you aren’t sure. That’s where the “new entries” playlist comes into play.
This playlist contains all the songs that are rated 4 or 5 out of 5 stars, but have zero plays. (See image below)
Then, you can easily find all the songs that you have rated highly that you haven’t listened to yet, to check if you like them or not. This allows you to quickly decided, and then solidify the rating with a play or change it and remove it from your radio station. On to step 3!
STEP 3. – Genre. In your library, there will be many genres, many of which you will wonder, what the? as to how the music program that you use is able to determine that, when to you, it means something else. Maybe something labeled as Rap is actually Hip Hop? Something labeled easy listening is actually Jazz? This is purely personal and I would recommend going through the genres (if you do this while rating songs it goes pretty quickly) and thinking what you want as your genres. When I go to large CD stores, I find that they have WAY too many genres. I think, who decides what genre what band is in each genre? What happens when a band changes genre, do you put the artist together or split them?
When I first started collecting CDs, I had them all in alphabetically order, but as my collection grew, I would only ever play the same CDs (when I used to play the CD in a CD player!) because those were the ones that were in front of me and the easiest to get to. So a few years ago, I had a major reshuffle and split then into FOUR MAIN genres. Because of my tastes, these are: DANCE, HIP HOP, ROCK and OTHER. Now, I know this is pretty general – considering OTHER contains: Easy Listening, R & B, Soul, Funk and everything between. However, this is good when trying to determine what you want to listen to, it doesn’t limit you to a few artists. It also makes it easy to make a decision – dance or rock or hip hop or something else? Having only a few main choices speeds up decision-making until you get into more detail.
However, on a computer, this is thrown out the window. It’s not easy to scroll through 2000+ songs in one playlist that contain lots of different genres. I would suggest limiting it to about 12 different genres, any more than that and you are becoming too detailed. (See my selections below). I may have become just a little too specific, but my track count is getting quite large!

STEP 4. – Artists. This is where you will need to be patient and have a bit of thought. I have created a playlist for each artist in my library that have their own CD release. The only issue with this is that many artists like to collaborate, which then creates the issue of “Artist 1 feat. Artist 2”. This unfortunately will then show up in each playlist for artist 1 and 2. You may or may not want that to occur. In the latter case, there are two ways to go about eliminating the unwanted songs from the playlist.
Option 1 – make exceptions to the playlist to eliminate all the unwanted tracks by excluding particular albums. (See the screen shot below).

This is a good option, as you will always find the tracks that each artist is involved with. However, if they are a well-known international artist (particularly R & B or Rap artists) they tend to be on MANY albums! This gets really annoying, and involves too many rules.

Option 2 – Select only the albums that are theirs. (See screen shot below)

This may seem like a lot of rules, but this used to be thirty rules and it would always eliminate one particular album!
STEP 5. – Your favourites. This is the fun step! Having created all those playlists, you can then sit back and create a few that really capture your favourite songs. I have playlists that select songs that have: over 25 plays, over 50 plays and over 100 plays. This is really useful if you want to listen only to songs you really love – when you are driving in the car or in the shower, you don’t want to be skipping songs! (See the screenshot below)

STEP 6. – Others. What happens when you want to create a playlist that don’t have things in common? They don’t have the same artists, or are from the same genre have lots of plays? You could create playlists the old-fashioned way, adding songs one by one…or you can use COMMENTS. The great thing about the comments field is that you can put anything you like in there. For example, I have created my exercise playlist by simply typing EXERCISE in the comments field of every song that you wish to have in the playlist. (See screenshot below)

Now, you may be thinking that this is the same as entering each song individually into a normal playlist. However, one thing that sucks in iTunes is that if you make a normal playlist, it will ALWAYS be below all your smart playlists. After you have created all the artist playlists (see step 4), you would have to scroll….and scroll….and scroll….to get to the non smart playlists. This is fine if you don’t use them on a regular basis, but then, why would you be making the playlist in the first place?
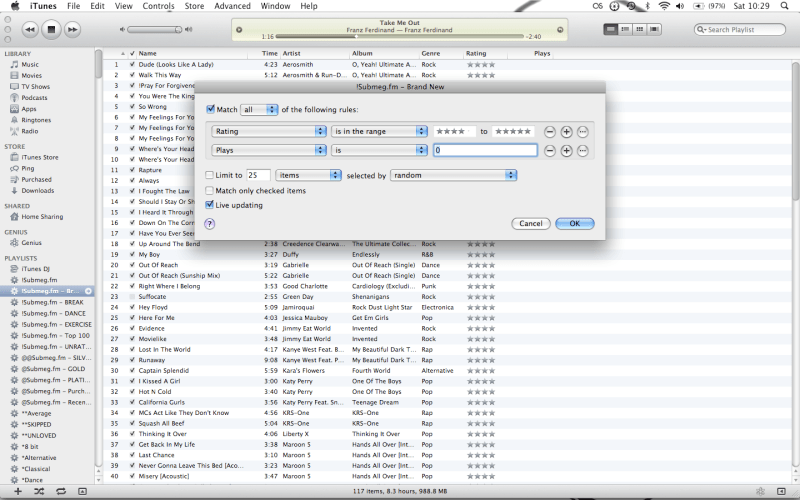
STEP 7. – Maintenance. This is the most tedious step, however, it is the most important. Once you have set up all your playlists, you need to maintain them, otherwise they are no longer important. There are three playlists that help in this task – the “Brand New” playlist (see step 2), UNLOVED and UNRATED playlists. The UNLOVED playlist is for songs that you haven’t listened to, no matter what their rating (See the screenshot below)

The other is the UNRATED playlist. This singles out the songs that you have added to your library but haven’t rated. This stops songs from entering the “fifth drawer” and helps you to keep that drawer clutter free! (See screenshot below)

There is one final step….
STEP 8. – Listen! Listen to your music and enjoy an organised library that makes it really easy to find your favourite songs!
There is one question that some people may never need to ask, but someone in my position may have to start thinking about…
Q: What happens when your portable music device cannot hold your entire library?
A: The answer is simple. Do you remember when you rated all your songs in step 1? the easiest way to free up space is to deselect all songs that only have 1 out of 5 stars (and if you get desperate, even 2 out of 5) so that they aren’t transferred to your device. Another space-saving technique is to deselect duplicates. When songs get popular, they are occasionally put onto compilation CDs, however you may already own the song from a previous album. To remove duplicates, go to the FILE menu in your music program and select, “show duplicates”. (See screenshot below)

Make sure you are in your music library (not a playlist) and then either deselect them or delete them from your library as desired.
Hopefully these tips make your music library much more organised and will help stop you from skipping songs, makes it easier to set a mood and make it easy to find particular songs!
Come check out the directory for the rest of my iTunes tips!
Submeg
music, IT, Mac
